Creating / editing a post
Creating / editing a post
Creating or editing a post
You begin a new post the same way you would begin any page in Cascade. Start at the "Add Content" icon at the top of your page and choose "Post." Most of your fields work just as they do in any Cascade page. Below we look at some that are special or more important to blog posts.
Store your new post in the right folder!
Before you do anything else, it is imperative that you put your post where it will need to be found when yearly listings are created. To do that, be sure to tell it to save to the right year/month folder. Choose the "Placement folder" as follows:

Configuration and content
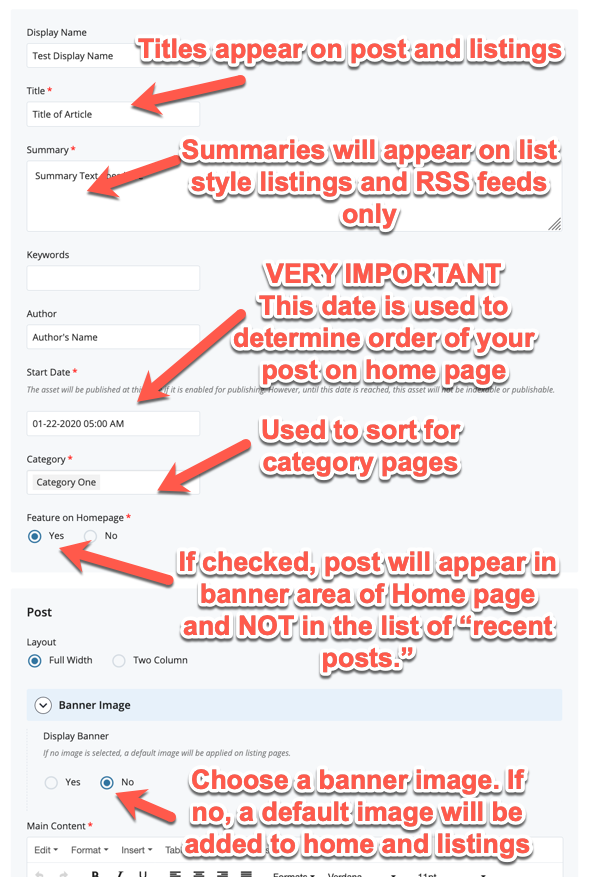
Though much of the rest of your post assets look much like any other page in Cascade, there are some special fields to be aware of:
- The title field appears on posts and listings.
- Summary will only appear when you have chosen a list style listing.
- The date value will determine the order of your item on the home page and in lists.
- Choose as many appropriate categories as you like. These will be used to create category listing pages and to supply "related link" lists to other posts as you would like.
- If you decide to feature your item on the home page then it will only appear in the top, banner section of your home page and will not appear under "recent posts" section. In addition, once more than three other items have been added as features, your item will drop off the home page completely.
- If you do not add a banner image to your article, a default image will appear on the home and category listings next to your post.
Layout
The "Layout" choice, I don't address above. As with all blog pages, you have a choice between two-column and full-width layouts. If you choose the two-column layout you will need to choose sidebar options and add them to fill the sidebar.