Project Description
Project Description
Project Objectives
- Produce McKibben Muscle actuator for data collection, testing, and analysis.
- Present data in high-quality presentable figures
- Write-up project report that clearly shows the data figures, results, and conclusions made about individual muscle and class data
Supplies (McKibben Muscle)
Materials
- Nylon braided sleeve
- Latex balloons
- Zip ties
- Hot glue
- 60 mL plastic syringes
- Silicone tubing
Equipment
- Scissors
- Hotglue Gun
- Optional: pliers, soldering gun
Software
- Graphing software (e.g., MATLAB, Python, Excel, Google Sheets)
Instructor Prep
Instructors should be familiar with how to build and operate the McKibben Muscle prior to the project. Having example muscles prepped will benefit students during their construction process. Also, air leakes are pretty common when making these. Learning how to seal off the leaks effectively may be beneficial to save materials and produce more accurate results for the muscle.
Instructors should provide a document with deliverables on what students need for the report, and questions for students to analyze their data and results.
How to make the McKibben Muscle
The following section is reproduced from our paper to be available online via ASEE.
Midiri, J. R., & Trieu, K., & Xue, W., & Trkov, M., & Jamison, C. S. E., & Bakrania, S. (2024, June), BYOE: McKibben Creature - A Low-Cost Robotic Simulation of A Biological Environment Paper presented at 2024 ASEE Annual Conference & Exposition, Portland, Oregon. 10.18260/1-2--48435
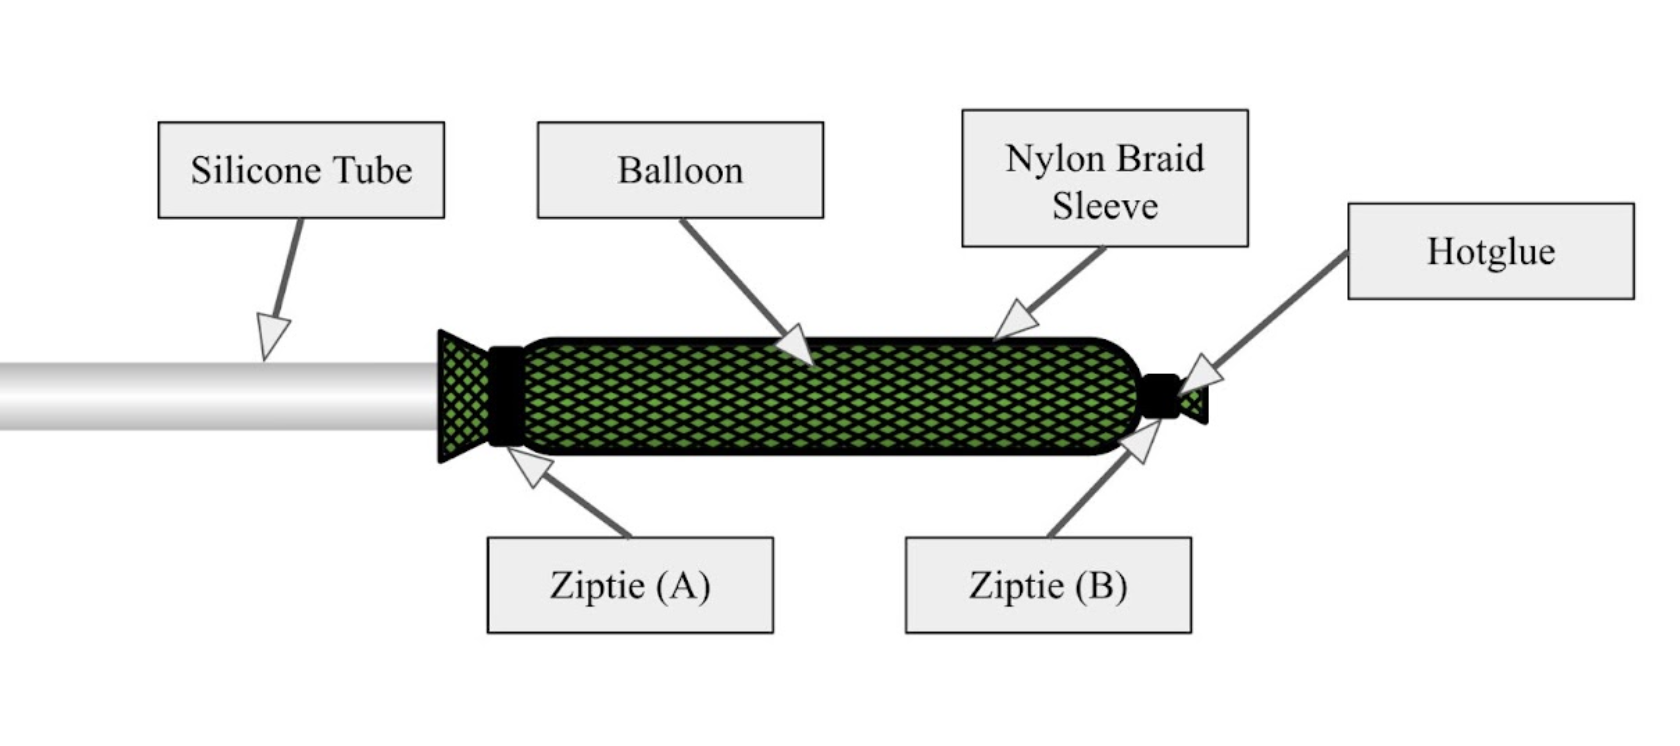
Diagram of McKibben muscle and its components
Instructions on how to create the McKibben muscle (refer to Figure above):
- Insert a rubber balloon through the nylon braided sleeve, ensuring the balloon is somewhat taut and that the open ends of the balloon and nylon sleeve are lined up
- Cut off about ~3ft of silicone tubing and attach a plastic syringe to one end
- Insert ~¼” of the open end of silicone tubing into the open end of the balloon and nylon sleeve
- Seal the balloon, nylon sleeve, and silicone tube together with a zip tie (A)
- Secure a zip tie (B) on the other end of the balloon and nylon sleeve
- Note: to ensure zip tie (B) is secured around the balloon and nylon sleeve, you can hold it into position while inflating the balloon and make sure they move in unison
- Apply hot glue around the zip tie (B) to the nylon sleeve.
- Note: Avoid applying the hot glue to the inflated side of the balloon
- Cut the excess nylon braided sleeve
- Note: Alternatively, you can use a soldering gun to create a sealed or unfrayed end
Troubleshooting:
Students can identify leakages in the McKibben muscle when inflated. Students may need to further tighten zip ties to resolve leaks which can be aided with a pair of pliers. They may also be able to twist the open end of the balloon to close any gaps around zip tie (A).
Phase Timeline
Phase 1: Build
- Introduce the Mckibben Muscle, project overview, and objectives.
- Ideally do this before midterm or week before building the muscles
- Build the McKibben Muscle
- Students in 1 class should be given the same dimension with a tolerance for the length of the McKibben uninflated because it is the 1 parameter that can easily be controlled when building the muscle.
- Single muscle should only take about 15-20 minutes to build. Give students about 30 minutes to build in case of troubleshooting any issues.
- Give students the data parameters they need to collect on their individual muscles.
- Measure the distance between both zipties
- Measure fully inflated balloon diameter, take measurement from center
- Force capacity (perform tests to see how much weight should be lifted x amount of times)
- After x amount of force trials measure inflation diameter again
Phase 2: Data Collection
- Students collect the data on their own muscle and upload it to a form or spreadsheet.
- Give students 1 week from the build to collect their data
- Give students access to the class spreadsheet after all of them have uploaded their data. If someone starts early and doesn’t have all of the data then their results would likely be different.
- Specify the units that the students should use so that everything is consistent in the data
Phase 3: Data Presentation
- Create plots using the class data for each data parameter
- Split data into subgroups
- Generate box plot compare mean and standard deviations of the groups
- generate x̄ chart
- Show useful information
- Mean, standard deviation, control limits, specification limits
Phase 4: Analysis and Conclusions
- Calculate means and standard deviations for each plot
- Calculate control limits for x̄ chart
- Calculate process capability and performance Cp and Cpk
- Perform any other analysis given by instructor
- This is where instructors can add other concepts like confidence intervals and hypothesis testing for students to further analyze the data and use the concepts.
How to Incorporate Multi-Sampling Concepts
As mentioned before, certain concepts require multiple sample groups analyzed over a period of time. This is because they look at each sample's means and standard deviations to look for any outliers. It is difficult for a single class to do so by just having them make a single muscle.
To properly compare 2 or more different class samples, ideally both classes will have the same targeted dimensions for the length of the muscle. The muscle lengths and tolerances can be different but should not be a drastic difference in length, otherwise the multi-sampling concepts won’t make sense because it is essentially 2 different manufacturing processes.
Some Ideas:
- Have students make multiple Mckibben Muscles
- Have 2 or more classes compare data
- Instructor can do trial run of experiment and use that data with the class data
- Do one of these for a single semester, then use previous data with new class
- Last Resort: Use random number generator with the same range as class data to have fake data sets to use with the class data
[2]
Example Data Spreadsheet and Analysis Questions
Example Spreadsheet
Example Q&R McKibben Muscle Project Example Spreadsheet Template
- The template is set up with 2 classes comparing data.
Example of Muscle Expansion Length Sample Data and Plot
- The data was obtained using a random number generator with a range of 4.245-4.255in. This range is centered around the mean target length of 4.25 in with a tolerance of ± 0.005in. The spreadsheet shows how students should organize the data and plot the distribution.
Example Questions
In order to have the students apply the concepts taught in the course, a document of questions for the students will need to be provided for them to perform analysis on the data.
- Confidence Intervals
- What is the 95% Confidence interval for the McKibben Muscle Inflated diameter?
- Two-sided, or one-sided
- Hypothesis testing
- Prove the mean height for the class data is equal to the length the students were instructed to make the muscle.
- Choose to give the students an ɑ value so they solve for different significance levels
- Data Presentation
- Is the data normally distributed or skewed? If the data is skewed, how may it affect your answers?
- Do the values for mean and standard deviation make sense?
- Process Control
- Calculate control limits
- Do data points lie outside the control limits? Why?
- Is the process in control?
- Calculate control limits
- Process Capability
- Calculate Cp and Cpk
- What do these values tell you about the process?
- Calculate Cp and Cpk