Project Description
Project Description
Project Objectives
- Produce a soft robot using only McKibben muscles to actuate
- Accomplish of 3 design challenges in robot: Locomotion, collection and storage
- Compete at the end-of-term competition for tokens in a set up environment for extra credit
- Write - up a design report for robot
Supplies
These are the general supplies required to create the McKibben creature. For more specifics of cost and estimated amount needed, refer to the Bill of Materials section.McKibben Muscles
- ½” Nylon braided sleeve
- Latex balloons
- Zip ties
- Hot glue
- 60 mL plastic syringes
- Silicone tubing
Creature Body
- Cardboard (can be made with any kind of rigid material)
- Optional: duct tape
Food Tokens
- Paper towel/napkin (crumpled to fist size)
- 2 Rubber bands
Equipment
- Box cutters
- Cutting boards
- Scissors
- Optional: Pliers, Hot wire cutter
Instructor Prep
Instructors should be familiar with how to build and operate the McKibben muscle prior to the project. Having example muscles prepped will benefit students during their construction process. Instructor’s should also have example tokens ready before students begin Phase 2 - Collection. Instructions of how to produce the McKibben muscle, how to create the food token and set up environment and the sample weekly timeline are provided below.Phase Timeline
Phase 0: Actuation Introduction
- Introduce the McKibben Muscle
- Build a McKibben Muscle together
- Introduce the project overview, end-of-term competition and robot challenges: Locomotion, Collection & Storage
- Develop preliminary design for robot
Phase 1: Locomotion
- Students address how to get their robot to move around
- Students may choose their directionally degree of turning and/or reversibility
*Instructionary note: To ensure students locomotion designs have enough strength to move additive components, encourage students to test their robots with added weights
Phase 2: Collection
- Students address how to collect “food” items
- Students may choose what elevation levels they'd like reach
*Instructionary note: Instructors should have tokens ready by this point to allow students to test their collection mechanisms
Phase 3: Storage and Improvements
- Students address how to collect “food” items
- Students may choose what elevation levels they'd like reach
*Instructionary note: Instructors should have tokens ready by this point to allow students to test their collection mechanisms
Phase 4: Final Competition
- All teams will compete in final competition.
How to produce the McKibben muscle
The following section is reproduced from our paper to be available online via ASEE.
Midiri, J. R., & Trieu, K., & Xue, W., & Trkov, M., & Jamison, C. S. E., & Bakrania, S. (2024, June), BYOE: McKibben Creature - A Low-Cost Robotic Simulation of A Biological Environment Paper presented at 2024 ASEE Annual Conference & Exposition, Portland, Oregon. 10.18260/1-2--48435
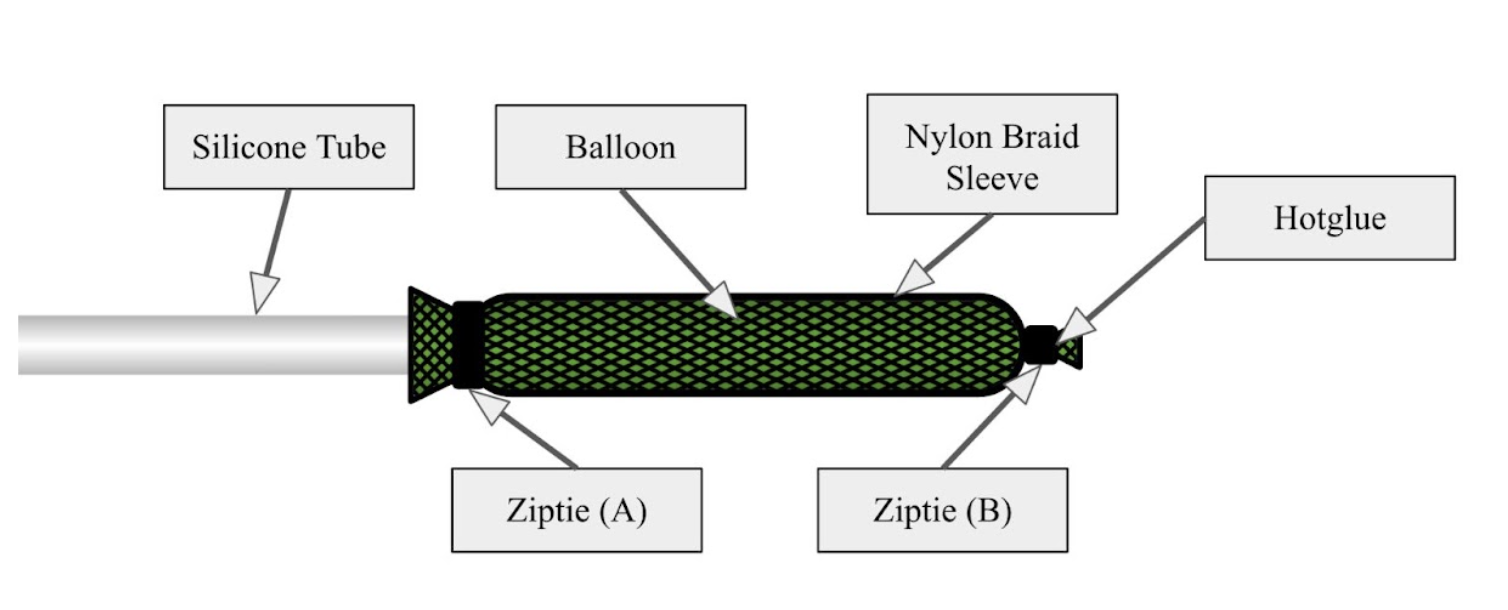
Diagram of McKibben muscle and its components
Instructions on how to create the McKibben muscle (refer to Figure above):
- Insert a rubber balloon through the nylon braided sleeve, ensuring the balloon is somewhat taut and that the open ends of the balloon and nylon sleeve are lined up
- Cut off about ~3ft of silicone tubing and attach a plastic syringe to one end
- Insert ~¼” of the open end of silicone tubing into the open end of the balloon and nylon sleeve
- Seal the balloon, nylon sleeve, and silicone tube together with a zip tie (A)
- Secure a zip tie (B) on the other end of the balloon and nylon sleeve
- Note: to ensure zip tie (B) is secured around the balloon and nylon sleeve, you can hold it into position while inflating the balloon and make sure they move in unison
- Apply hot glue around the zip tie (B) to the nylon sleeve.
- Note: Avoid applying the hot glue to the inflated side of the balloon
- Cut the excess nylon braided sleeve
- Note: Alternatively, you can use a soldering gun to create a sealed or unfrayed end
Troubleshooting:
Students can identify leakages in the McKibben muscle when inflated. Students may need to further tighten zip ties to resolve leaks which can be aided with a pair of pliers. They may also be able to twist the open end of the balloon to close any gaps around zip tie (A).
How to create food tokens and set up the environment
Environment:
How the environment is up to the instructor’s discretion but an example set up may look like the following:
Food tokens:
Instructions for food tokens at higher elevation:
How the environment is up to the instructor’s discretion but an example set up may look like the following:
- 5 food tokens per each robot
- 40 ft2 of area per each robot
- Total time duration of 20 minutes
- Tokens at ground elevation - 1 point
- Tokens at higher elevation - 3 points
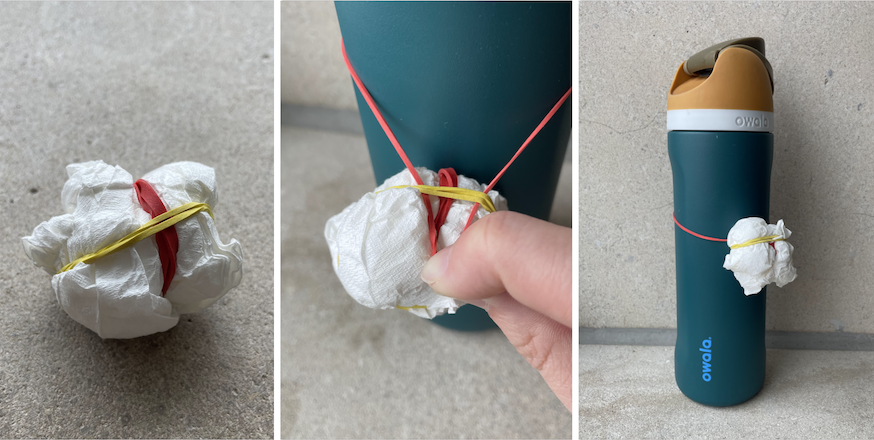
Food tokens:
Instructions for food tokens at higher elevation:
- Place a rubber band around a tall object (like the leg of a table or cardboard tube) at the preferred elevation
- Ball up a paper towel (about 2” in diameter) and wrap 2 rubber bands around it
- With the rubber band around the tall object, feed a small amount of it through on of the rubber bands on the paper ball (just enough so that the ball stays in place)
- Verify that you can take the ball off with a gentle tug
Final Competition details
“Food” tokens will be placed at varying levels of elevation with the higher levels valuing the most amount of points. The higher the token, the more points it's worth. A simple design and placment method of the food tokens can be made using paper towel and rubber bands as seen in the image. Students are encouraged to create robot designs strategically to obtain the most points. Duration of competition can range from 10-20 minutes. Points gathered during the competition will count as extra credit towards their design report.