Concur Mobile App
Concur Mobile App
Concur Mobile App
Concur offers a mobile app you can download to your smartphone or tablet. The mobile app allows you to upload receipts at the time of purchase and Approve Requests/Expenses on the go. The Concur app allows you to take photos of your receipts using a smartphone. The receipt images will be uploaded into your Concur profile and will be available to attach to an expense report.
In addition to snapping photos of receipts, you might also use the Concur app to:
- View travel reservations
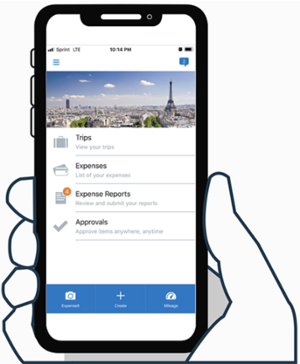
- Edit, delete, or enter new expenses
- Approve Requests
- Approve Expense Reports
Note: The mobile app does not support delegates.
This page will provide guidance with the following:
Download the Concur Mobile App
Download the Concur mobile app on your Apple device:
- Select the App Store icon.

- Select Search on the bottom right corner of the screen.
- Enter “Concur” in the search field.
- Multiple options will appear. Select the word Concur.
- Select Get to the right of the SAP Concur app.
- Select Install.
- If needed, enter the password for your Apple ID to download the app. Select Sign In.
- Once the app downloads, select Open.
- The Concur mobile app will open.
Download the Concur mobile app on your Android Device:
Using the Concur Mobile App
Log in to the mobile app using SSO
- Open the Concur app on your smartphone or tablet.
- Enter your Rowan Network Username and Password.
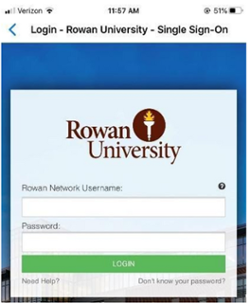
- Select LOGIN (complete duo, if prompted).
- The Concur mobile app home screen will appear.
Navigating the Homepage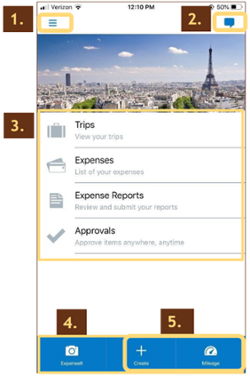
- Access Request Safety Assistance, Check In Location, Help, Privacy Policy, Leave Feedback, Settings, Sign Out, etc.
- Use the Message Center to access direct messages from Concur.
- Access information regarding Trips, Expenses, Expense Reports, and Approvals (if you are an approver).
- Use the ExpenseIt option to take pictures of receipts during your travel.
- We will not be using the create and mileage features on the mobile app.
Uploading Receipts
When you upload receipts using ExpenseIt, you can digitize your receipts on the go – meaning you won’t have to keep track of all your paper receipts. By digitizing these receipts, expense line items will be created, categorized, itemized, and sent to Concur Expense for you. This automation decreases the time you spend on expense reports and increases your productivity.
Taking a quality photo of your receipts is very important. Dark or blurry photos can be difficult to read. So, remember to:
- Make sure the camera lens is clean.

- Make sure the camera is focused on the receipt.
- Take photos in a portrait (vertical) orientation.
- Take photos in a well-lit area. Otherwise, use the flash.
- Avoid shadows across the receipt.
Before uploading the receipt, double check the expense for accuracy.
ExpenseIt
What is ExpenseIt?
SAP Concur mobile app feature, ExpenseIt, creates itemized expense entries from receipt photos.
How does ExpenseIt turn receipts into expenses?
ExpenseIt utilizes a variety of techniques to read and predict several critical values from a receipt. Using these techniques, ExpenseIt works to identify the amount, currency, date, location, expense type, payment type, vendor, and hotel itemizations.
Can users e-mail a receipt to ExpenseIt?
In addition to capturing receipts with ExpenseIt in the SAP Concur mobile app, users can take advantage of the functionality by e-mailing their receipts to the ExpenseIt alias designated for your region:
How to Upload Receipts
- Open the Concur app on your smartphone or tablet.
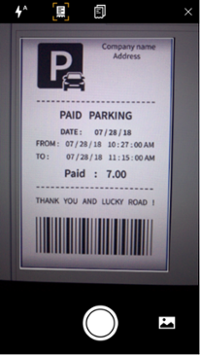
- Select the ExpenseIt icon on the bottom toolbar of the home screen.
- Your phone’s camera will open.
- Select the lightning bolt icon to change the camera flash to auto, on, or off.
- The receipt icon helps the camera detect the receipt. Select the receipt icon to turn this feature on/off.
- Select the multiple page icon if your receipt is multiple pages.
- Select the x to go back to the app home page.
- Select the mountain icon to upload a picture of a receipt from your phone camera roll.
- Select the circle at the bottom of the screen to take a picture of the receipt.
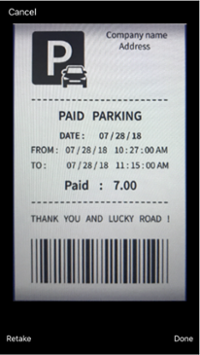
- The picture of the receipt will populate.
- Select the thought bubble with three dots on the top right corner to add a comment regarding the receipt.
- If the receipt is missing information or the text is illegible, select Retake on the bottom left corner.
- If the receipt is legible and has all information, select Done.
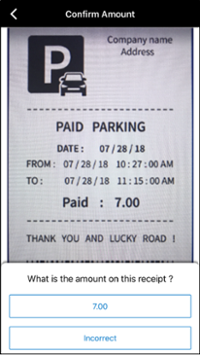
- You will be prompted with the question “What is the amount on this receipt?”
- Select the suggested amount if it is correct.
- If the suggested amount is incorrect, select Incorrect then input the correct amount and select Use.
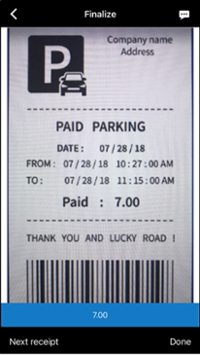
- Verify that all the information is correct then select Done.
- You will see the Receipt added to your expenses.
Submitting Mileage Expense Report
Create a New Expense Report
You can create an Expense Report for mileage on the Concur app because it does not require a Request or Encumbrance Approval Number (E#).
- From the Concur app home screen, select the mileage icon on the bottom right corner.

- Select + create a new Report.
- Fill in the required information denoted by an asterisk (*).
- Report name auto-populates but you should change it to explain the expense.
- Report/Trip Start Date and Report Trip End Date - select the right arrow
- Report Trip Purpose - select the right arrow and choose from the list of options
- Trip Type - select the right arrow and select Day Travel.
- Encumbrance number is not a required field. You do not need an encumbrance for day travel.
- Report Total will auto-populate based on your mileage.
- Trip purpose details - explain the reason for your trip.
- Fund - select the right arrow, search for your department’s fund by number or name, and select the fund
- Department/Org - select the right arrow, search for your department’s org by number or name, and select the org
- Travel Account - select the right arrow, select the appropriate travel account
- Program - select the right arrow, select the appropriate program
- Select Create on the top right corner of the screen.
- The add car mileage screen will appear. Select Add Route.
- A map will appear. Enter your waypoints.
- Select each route on the map.
- Select Use Route for the shortest distance.
- You will return to the add car mileage screen. Fill in the required information denoted by an asterisk (*).
- The transaction date will default to today’s date. Change the transaction date to the trip date.
- Purpose of the trip - select the right arrow, type in the explanation for your trip, andd select done.
- From Location and To Location - will be auto-populated based on the map.
- Distance - will be auto-populated based on the map.
- Vehicle ID - IRS default rate will appear but you can change it to State of NJ Grants by selecting the right arrow.
- If you have passengers, select the right arrow, type the number of passengers, and select the back arrow.
- Select Save.
- The expense has been created.
- On the top right corner of the screen, you will see the total amount that was based on the number of miles you drove.
- Above the total amount there are three dots (…). If you select the three dots, you will see Copy Report, Report Attachments, and Delete Report.
- Select Details to review the information you inputted into the expense is correct. Make changes if necessary.
- Once you have verified that all the information is accurate, select Submit at the bottom of the screen.
- The User Electronic Agreement will appear. Select Submit.
Copy an Expense Report
If you travel to the same destinations often, you can copy your current Expense Report for future Reports. Once the Report is copied, you can make any necessary changes such as travel name, travel start and end dates, expenses, etc.
- From the Concur app home screen, select Expense Reports.

- Select the name of the Expense Report you want to copy.
- The Expense Report will appear, select the three dots (…) on the top right corner of the screen.
- Select Copy Report.
- Type in the name of the new Report. Select Confirm.
- The copy of the Report will appear. Select details and make changes to the Report to reflect your new trip.
- Select expenses, select the name of the expense and make changes to the expense to reflect your new trip. Select Save.
- Verify that all of the new information is accurate then select Submit.
- The User Electronic Agreement will appear. Select Submit.
Delete an Unsubmitted Report
- From the Concur app home screen, select Expense Reports.

- Under unsubmitted, select the name of the Expense Report you would like to delete.
- The Expense Report will appear, select the three dots (…) on the top right corner of the screen.
- Select Delete Report.
- A new window will appear. Select Delete.
Recall a Submitted Report
You cannot change or delete an expense that has been submitted unless you recall it first.
- From the Concur app home screen, select Expense Reports.

- Under submitted, select the name of the Expense Report you want to recall.
- The Expense Report will appear, select the three dots (…) on the top right corner of the screen.
- Select Recall Report.
- A new window will appear. Select Confirm.
- Once recalled, you can make changes, then submit the expense again for approval.
Approving using Concur Mobile App
Approving a Request
- From the Concur app home screen, select Approvals.
- On the Approvals screen, select the Request Approvals you wish to approve.
- To review the Request details, select Summary. To review segment details, select Segments.
- When you are ready, select Approve or Send Back. If you send a Request back, you must provide a comment.
Approving an Expense Report
- From the Concur app home screen, select Approvals.
- On the Approvals screen, select the Report Approvals you wish to approve.
- Review the Report Approval details by selecting Details, Expenses and Receipts.
- When you are ready, select Approve or Send Back. If you send an Expense Report back, you must provide a comment.
Contact Information
Rowan Contact Information
Accounts Payable Travel Inbox
asktravel@rowan.edu
Direct Travel Contact Information
rowantravel@dt.com
866-228-3916
Monday-Friday, 8:00 a.m. - 5:00 p.m.
Online Travel Booking Support
onlinetoolsupport@dt.com
800-999-7939
Monday-Friday, 8:00 a.m. - 8:00 p.m.
*Additional fees may apply for calls outside of business hours and should be used for emergency travel services.
Insurance Contact Information
Risk Management & Insurance
(856) 256-4370
Website: Business Travel Accident Insurance
AIG
Email: assistance@aig.com
U.S. and Canada Toll Free: +1 877 244 6871 or +1 877 278 7196
Register for an AIG Travel Guard User Account
