WYSIWYG
WYSIWYG
WYSIWYG
In web editing, the text editor is called "What You See Is What You Get" or WYSIWYG. Like Microsoft Word or Google Docs, many of the formatting options work exactly the same, such as bold, italics, and underline. Use the editor's built-in tools: Most WYSIWYG editors have built-in tools for formatting text, creating lists, and inserting images and other media. Use these tools instead of manually adding HTML tags to the content.
Avoid copying and pasting from other sources: When you copy and paste text from another source into a WYSIWYG editor, it may bring extraneous formatting code that you don't need. Type the content directly into the editor or use a plain text editor like Notepad to strip out any formatting before copying and pasting.
Callout Box
The callout box is a visually attractive web design tool that can be placed onto pages and can help complete a call to action. The callout box will float to the right of the text. While in the WYSIWYG editor, the box will appear gray. However, it is a yellow and goldish box!
Do you remember learning about a Call to Action in the Contributor Stewardship Course?
Style
The box's left margin color is deep yellow (#f2a900).
The box color is bright yellow (#ffcc00) with 25% transparency.
To apply a callout box, highlight text inside of the WYSIWYG, click Formats, navigate down to Custom, and select callout-box.
Troubleshooting
To best visualize this, navigate to the View dropdown and enable the Show blocks setting. Highlight all of the text inside one "p" box, then apply the callout-box styling. The callout box will not work by highlighting a partial amount of text in the box.
Please visit the WYSIWYG Styling document for an in-depth explanation of how to apply each option.
Buttons
To add a button to your WYSIWYG, first create a hyperlink. A hyperlink is a link to another page, document, or anything somewhere else on the internet. They are usually underlined in blue font and clickable. With just a few clicks, you can convert any hyperlink into a button.
Use the Align left, Align center, or Align right options to shift your button in the editor.
Creating the Hyperlink
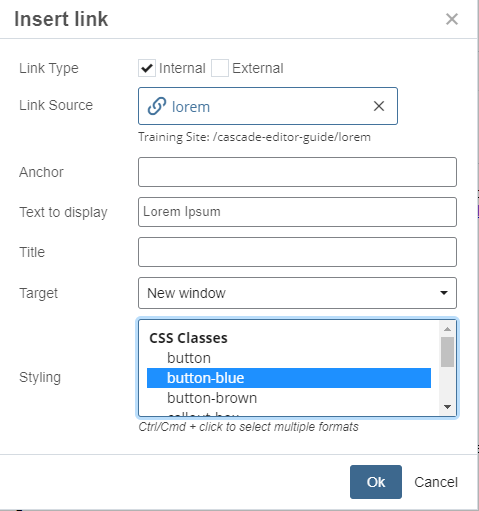
First, we need to tell Cascade where the page is located. On the WYSIWYG toolbar, click Insert and select Link (Ctrl + K) to choose the Link Source.
Adding the Button Styling
At the bottom of the Insert link window, choose a CSS class of button, button-blue, and button-brown. I will create a hyperlink to a Lorem Ipsum page and select the button-blue styling.
Buttons are great options for aiding a call to action.
Special Headings B and Y (Outdated)
The special headings styling colors a Heading 2 to brown or yellow. At this time, the tag must be an H2 and not an H1 or H3. We are currently reviewing this special class to expand functionality.
To properly apply the styling, first, select only the H2 text you wish to style. Navigate to Formats, then Custom, and then choose the special heading styling.
Special Heading Brown
The special heading brown styling transformed the heading with brownish text. To remove the styling without deleting your content, select the text, go to the Format tab, and select Clear Formatting.
Special Heading Yellow
The special heading yellow styling transforms the heading into this yellowish text. To remove the styling without deleting your content, select the text, go to the Format tab, and select Clear Formatting.
Expand Image (Outdated)
The "expand-img" custom styling class allowed an image to fill the full width of the user's device while the device screen size was at or below 558 pixels.
This primarily targets smaller mobile devices and this custom styling will become a default option in the future.
Without the Styling

With the Styling
